Wednesday, December 30, 2015

Let me hear your battlecry! - part 3


My final post on building my force for Dux Britanniarum, any further post will be battle reports or campaign updates. Below is an overview of Sigeric's band of warriors now ready to plunder the riches of Britain. Chronicles note:  Alas Sigeric memory of his band may not match actual history (AKA what I actually roll up for Sigeric may be different than below!)


  Sigeric “Always Victorious” is the second son of Maganradus and has already established himself as a proven warrior with several victories over Frankish Foederati.
 
Though it is this success that has caused friction with his older brother and in turn put his life in danger!


His mother (Giselberga) pressed him to leave and strike out his own before something "terrible" happened to him. With the knowledge that his older brother will inherit his father's lands, it is an easy choice to flee danland.

He buy's himself and his small band passage on a ship to the British Isle in a quest to carve out lands for himself.

As always, Leofric “Friendly Blade” his trusty champion, accompanies him as he sets sails for the British lands with fourteen other Vikings.
 
They land at Iceni and soon travel through Mercia to Catuvellauni, as he has heard that there are plenty of warlords aspiring to take lands from the weak British lords.

At Catuvellauni, Ecbald, Hamrolf, and Leofric spread tales of Sigeric might of arms and it is not long before he comes to the attention of a Walord. Auduin must have seem something in Sigeric as he allows twenty two other raiders to join his band.

His warband is now large enough to begin raiding the British lands of their riches. With success he hopes his band will grow and allow him to become a warlord in his own right.


Except for his two trusted friends, Sigeric will keep his best warriors by his side. They will form the elite of his warband and will be counted upon to vanquish any resistance encountered. Adorned in their heavy mail, with blade and shield they should excel at this task.


Ecbald “The Bold” is Sigeric’s oldest friend, and he will lead the bulk of the other warriors. In particular, the brothers Forwin and Frotfird were placed under the watchful eye of Ecbald. While the two are excellent fighters, due in large part to their constant fighting between themselves, they need a strong commanding presence to keep them from “accidentally” killing one or the other!


Hamarolf “The Hammer” will command the other six warriors. They are the fittest and fastest of his warriors and Sigeric expects he will send The Hammer on numerous flanking attacks with these warriors. Dagaleich, Brandulf, Hroddag and Ganefard are the youngest warriors in the band and should test Hamarolf with their youthful agility.


Sigeric is also accompanied by four woodsmen with bows. While they are not much use in battle, they provide Sigeric with some scouts and hunters. The best Sigeric can expect of them in battle is to harass the enemy with their arrows.


Of the four, the boy Wulfstan "Stone Wolf" has some talent. Though he is a British slave (won by Sigeric while gambling at Iceni) he is an excellent shot with the bow.


The boy's British name was Teutorigos but he was aptly given the Danish name Wulfstan by his former master after he calmly faced and brought down a charging wolf.

However, his real value is his knowledge of the area and his mastery of the British language that Sigeric will utilize from the boy.
 
UPDATE
I have finished the Saxon mounted contingent ...

Wednesday, December 16, 2015

Austrian Cuirassier Regiment II

Long overdue but the second regiment of Austrian Cuirassiers is finished! I was able to finish up the unit in between some of my other projects.
BP Cavalry Regiment: 12 figures on four bases - 240mm wide by 50mm deep.


For some reason the white turned about better on this unit. I suspect it is because I am using a different can of Tudor "dip" on this regiment.


I also painted up a few more generals for the Austrians ... I now have plenty of Division and Brigade leaders for any Black Powder game using my Austrians.


Next up for Napoleonic's: I am leaning towards painting up four more French Battalions ... I have some very "old" Old Glory figures and think I'll just slam out a few battalions to bulk up the French basic's (currently only have 6 Bn's). Though I would really like to do so more Russian's! I'll let you know what wins out on my next post.

Tuesday, December 8, 2015

Let me hear your battlecry! - part 2

It has been two months since I last posted, but I was not idle during those weeks. I have for the most part finished all of the leaders and elite troops, as well as the normal warriors.

Nobles and Elite Warriors
I tried to layer on the paint to give some definition to the clothing, not sure it was worth the effort (aka time) but it does really make some colors stand out.

No shield transfers for these warriors.

Next up were the warriors for the warband. I was going to go hog wild on patterns, but after a couple of less than successful "designs" I decided to just paint plain colored cloth for the rest of the figures. It has been my experience, that once a figure is on the table, all the "fancy" work on the figure disappears.
I gave most of them spears, as another subtle difference between the armored and non-armored troops when playing the game.
Another Noble if needed
Speaking of shields, I unfortunately discovered that the small shield transfers for the gripping beast figures were to big to fit! So I ended up having to hand paint the shields. Some of them turned out good, some not so much, though as a bonus they all fit in with the painting style of the figure. I had about fifty to do at once, so after priming them, stuck them to "dull" tape to paint up ... this worked really well.
Extra Shields
I still have some archers and light cavalry to finish, which I hope to get to next week. The archers will painted just like the warriors, but might spend some extra time on the horsemen as I only will ever paint up four of them.

Primed and Ready for Paint
I have yet to fully decide on whether to "Dip" the figures or not. I am leaning toward dipping as I have been doing that to all my miniatures for years now. Though I do like how the color pops off the figures and know the dip will dull those colors down. I am also worried about the shields getting to much dip on them.  But I suspect once I have finished the skirmishers, I'll dip the whole batch of them in on go.

Then it will be on to basing ... which I have yet to decide on 20mm or 25mm rounds? I am leaning towards 25mm but several others seem inclined toward 20mm rounds. I suppose at the end of the day it won't matter much, though basing is kind of a pet peeve of mine.

In between painting the different class of Saxon warriors I have been finishing up a second unit of Austrian cuirassiers.
And while I am at it ... a few more Austrian generals as well.

I really need to get the above finished as there are several store projects piling up. Boromites for Beyond the Gates of Antares and US/USSR tanks for Team Yankee!

Tuesday, October 6, 2015

Let me hear your battlecry! - part 1

I finally received the Saxon figures from Gripping Beast last week and have started working on them. See a previous post on my latest project.

There was a little more clean up of the figures than I expected, especially as I had to clean up the hands to receive a weapon. But they are overall decent figures and am looking forward to getting them painted and on the gaming table.

I am starting with the leaders and elite troops ... the warband will need sixteen to start with, but have decided to paint up some extra's for potential upgrades throughout any campaign, so am painting twenty two.

As you can see I started with a quick application of silver on the chainmail and helmets. Except for the leader figure which I am going for gold armor. I'll add in the flesh next, then work on all the cloth. I am still debating on whether to paint the small shields or use shield transfers.
 
After the elite troops, I will work on the basic warriors ... another 24 figures. I plan on panting them in basic colors. Same for the archers which I'll do after the warrior figures. The last group I plan on doing is the four light cavalry figures ... not even sure the campaign will last long enough for them to be added to the warband, but it is only four figures so why not!

Monday, September 21, 2015

Dark Age Arthurian Church

So why I am waiting for the figures to arrive for the Dux Britanniarum project, I decided to work on a building we'll need for one of the scenarios, Raiding a Church.

I searched the web for some inspiration and ideas, though settled on mashing together a few images. Got out the graph paper and penned the design. Then cut out the basics shapes and glued them to the foam core. Which in turn I cut out and glued to the shape below.

 I decided to keep the area mostly open, to facilitate easy figure placement and movement. The top half is removable.

 I read that many churches in Britain had round apse, so cut out one end of the building and a section of a cardboard tube. This turned out to be the most difficult part of the whole build and would do it differently the next time I do this style of building feature.

I assembled the pieces, made a couple of doors and putted up the walls. Then hot glued it to a base. I added some stone patches for a walkway.

 The top went through several modifications, but I settled on using rare earth magnets to keep it in place. I really needed to add some strength to the roof and may go back to add them in.

 The painting was pretty straight forward ... went with a non-white, beige tan color. The roof tiles look good, much better in person than the picture shows.

The flocking around the stone pathway worked out really well and to add some "spice" glued on a couple of trees to the front. I was talked out of putting any kind of cross on the front, though may go back and add a Celtic or "Romanized" cross at a later time.

Plenty of room to move figures around. When I have time, I am going to add some interior features to the building; marble flooring and tapestries around the sides being the easiest.

But for now it is ready to use in our first Church raid ... now for the troops.

New Mini-Project: Dux Britanniarum

I have been tapped out on painting Napoleonic figures the last month. So decided to start a new small project. I wanted to do something dis-similar to Napoleonic's but small in scope.
So pretty much any Horse and Musket era was out. Also not keen on any of the 'Moderns' as I already have much of that.

At first I was leaning towards a SAGA warband as it is gamed at the store and generally a small warband. But while I generally like the SAGA rules, I find they get repetitive.

I have always been keen on the Arthurian legend, so took a look at Dux Britanniarum rules from Too Fat Lardies ... Sold!


I went ahead and ordered up a Saxon raiding force from Gripping Beast which is about 45 figures. I am patiently waiting for the figures to show, as I am looking forward to painting up some chainmail and earthy colors, with a splash of color throw in.

What I am up to waiting for the figures to show.

Wednesday, August 5, 2015

Battle of Arroyos dos Molinos

In October 1811, word reached General Hill, the commander of the British forces in the vicinity of Badajoz, that a French force under the command of General Girard was on the move in western Estremadura.
 
General Hill combined his forces with the local Spanish forces and together they began a pursuit of Girard on the 22nd of October. On the 27th, Girard marched only twelve miles, stopping for the night in Arroyo dos Molinos. The Allies marched 28 miles that day and were within five miles of the town. At two o'clock in the morning of the 28th, Hills force silently moved on to the plain some few miles from Arroyo do Molinos, the stage was set …
 
Opening Shots
The battle started slowly for both sides, the French infantry attempted to form into a coherent battle line though only 2nd battalion of the 40th Regiment headed the urgent orders and it advanced to the right of the 1st battalion. The chasseur regiment (the 27th) also moved out and maneuvered to the far right flank.
General Girard attempts to get his forces organized.

My old collection of French Infantry (Old Glory circa 2000) 

The allied start was not any better, only the cavalry brigade, less one dragoon regiment, advanced toward the French. With this temporary respite, the French managed to get most of their battalions of infantry formed up. crucially, the 40th regiment was able to face all three battalion towards the allied attack.
The 13th Light Dragoons and 2nd KGL Hussars advance toward the French.

The 10th Hussars faltered when ordered to charge the British cavalry, leaving them exposed in the middle of the battlefield. As we'll see, this hesitancy was temporary.
The 10th Hussars approach Long's Cavalry Brigade (British Cavalry is Ken's Perry Miniatures painted by Rex)

General Hill had wanted to block the French from leaving Arroyos and so ordered Gen. Wilson's brigade on a wide flanking maneuver. Unsure of the whereabouts of the other French brigade, General Wilson dispatched the 6th Cacadores Battalion to scout after the brigade.
Mark's newly painted British Infantry on the advance (Front Rank Miniatures - Reinforcement Packs) 

The remaining five battalions of Wilson brigade had successfully maneuvered into position but before Wilson could launch his battalions onto the French flank, an aid informed him of a large force of infantry moving to his rear.
Could they be the Spanish reserves or the French brigade doubling back? Not sure, Gen. Wilson wisely turns the two battalions of the 18th Portuguese Regiment to face the approaching force.
Mark also broughtt all the Portuguese units, most are metal Victrix figures.

The three British battalions of Wilsons brigade (28th Foot, 34th Foot & 39th Foot) were then ordered to charge. The 2nd battalion of the 40th Line Regiment took the brunt of the attack, though due to the presence of allied cavalry, had already formed square, so were not flanked by this attack. However, the French square lacked the firepower to fend off the British line, and though it held out longer than anticipated, broke before it could be reinforced.
Pivotal Moment
Seeing the unsupported Hussars, the British 9th Light Dragoons charged the 10th. However, in the ensuing combat it was the 10th that out fought the British dragoons and forced them to flee. The 10th follows up the fleeing Dragoons and routs them from the battlefield! Though they have blown horses, and are very far behind enemy lines, the 10th is rearing for more fighting, so wheels about to flank the Portuguese battery.
 
While this was transpiring, on the far right, the French 27th Chasseurs had charged the 50th Foot, who inexplicably failed to form square even though they were very aware of the approaching cavalrymen. While they inflicted severe casualties on the chasseurs, it was not enough to break their momentum and the 50th broke. The routing Englishmen swept up a battalion of the Portuguese 6th Regiment as well. The victorious but beaten up Chasseurs then retired to the rear.
 
The large force turned out to be the other brigade of Girard's force returning to the field of battle. They were screened by the 6th Cacadores Battalion, but this battalion barely slowed down the 3,500 advancing Frenchmen.
Pete and Aaron (new BP players) ran the six battalions of Remond's brigade
(Ken supplied all the figures which are Perry Miniatures painted by Rex Blackwell)


While the Portuguese kept the French at bay, the rest of Wilson's brigade pressed on, but were stopped at the outskirts of Arroyos as several battalions of the 34th regiment had finally moved up to support the hard pressed French left flank.
Outnumbered two to one, the Portuguese battalions valiantly tried to hold off the French assault. But there were too many French battalions and they pushed the Portuguese onto the backs of the British battalions.

Endgame
Making matters worse, the French 10th Hussar now charged the Portuguese battery, which failed to face the Frenchmen and were easily wiped out. The momentum of the charge took them into the flank of the 92nd Highlander Regiment, who also failed to form square and broke from the flank attack.

The arrival of Mirillo's Spanish division gave the allies a glimmer of hope, but this was soon dashed when the French Dragoons swept away the Spanish Cavalry regiments! General Hill knew the day was totally lost and ordered Wilson to extract his command from the tightening noose around it.
My Spanish arrive and do nothing! (models are Elite Miniatures)

Final Thoughts
I really liked the scenario though really can tell if it was balanced or challenging for both sides, as Ken had some of the worst luck rolling dice we have ever seen!

The game brought up the fact that I do not have any French Dragoons, which prompted me to move them to the top of my painting list. In addition, I am now keen on painting up a battalion of Highlanders. I still have one more Austrian Cuirassier to finish and I think our next game will be an 1813 affair, but not totally sure yet.

Tuesday, July 7, 2015

1982 Falklands Air War

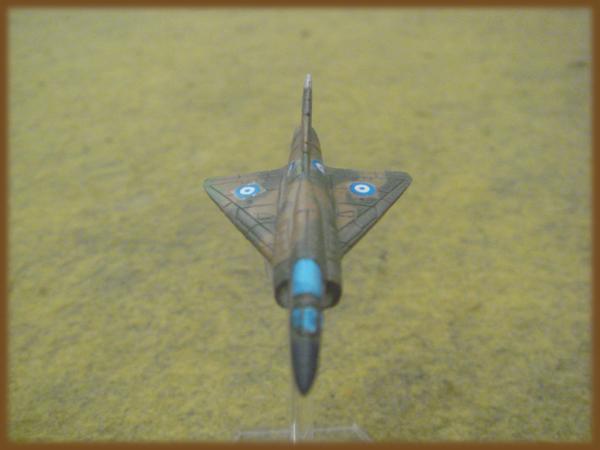
I have been putting off this project for months, (actually almost a year now!) But as I am currently not in a Napoleonic mood and painting the VC is turning out to be really boring (so much black). I finally broke out the airbrush and went to work on the Argentinian Mirages and Skyhawks, as well as the British Harriers.


Kind of a pain setting up (and taking down) the airbrush "station".
 

I have an Iwata HP-C (dual action) and have recently purchased a new compressor that has an air tank attached to it for a much smoother air pressure.
 
I am trying a new technique for the camouflage to get a "hard" edge. After spraying the light color (in this case brown), I used "blue" tac to cover up the lighter color and then sprayed the darker color.
 
First up was the Argentinian jets. I have already sprayed the brown, and then added the blue tac. I then sprayed the mirages bright green. Added some more blue tac (see the l9ighter color snaking tac by tail and wing edges) to cover the bright green, then sprayed the dark green.

The hard edge worked great, the two tone green not so much. I should have really brighten up the light green, but very workable game piece.

You can barley see the lighter green on the forward edge of the wings.
 
The skyhawks are pretty much the same camo scheme,
though they did not have the light green added. 
 
 
Up next were the British Harriers in the Extra Dark Sea Grey (EDSG) scheme, though in hindsight I should have done the Medium Sea Grey (MSG) as the colors are very dark on such small miniatures.
 
I sprayed the grey first and then the dark green.

I will only need four harriers for most of the games we will be running.

I am also using blue tac to "attach" the jets to the bases.
 
Next up was some detail work and the decals. At first I was going to do "white" canopies, but I thought it too stark a contrast, so went with light blue instead. Then added some black/grey to the engines and air intake ports. I decided against black lining all the groves on each jet, too many, too small.
 
 
Not a lot of decals two to four per jet ... and I think I'll put on some solvent tomorrow to see if I can get rid of the decal outline.

Might try and clean up the yellow ... I should have masked it and airbrushed the panels, but only two of the jets were getting them, so opted for the quick paint job.

Not the right Harrier for the period, but have to make do with what we have available.
 

All the jets we'll need for most of the scenarios, and took the better part of two days to complete fourteen jets ... though if I am feeling brave I might still go paint an Argentina flag on both sides the tails.
 
We'll be using Jet Age for the rules and already have an idea to print out top down views of the ships and mount on card stock for any ships needed.